Wainscoting is a great way to add character and style to your home. It can be used in a bedroom, living room, or other part of your house.
However, installing wainscoting can be tricky for beginners, but it doesn’t have to be!
In fact, installing wainscoting is easy once you have the right tools and knowledge.
Different type of wainscoting requires different approach to install, and the easiest one I think is the beadboard, which also will look good on any interior design.
Follow these simple steps and install beadboard wainscoting like a pro in no time.
Tools Needed
- Jig saw / miter saw
- Hammer / trim puller
- Measuring tape
- Stud finder
- Pencil
- Standard level
- Nail gun
- Hammer
- MDF beadboard panels
- 1×6 MDF baseboard
- 1×4 chair rail trim
- Finishing nail (#7 and #8)
- Adhesive
- Nail set
- Paintable caulk
- Wood filler
Step 1: Clean Everything
If you already have baseboard installed, consider whether or not you want to replace it.
If you’re going to replace the baseboard, be sure to remove it first using hammer, prybar, or trim puller.
Actually I remembered there was a product named RapidFit which enables you to install a baseboard over the old ones right away, but I think they’re not available anywhere right now. So, yeah, removing the baseboard is the only option.
However, if you want to keep your existing baseboard, you’ll only need to remove the base cap and scrape the remaining adhesive on top of the baseboard.
This baseboard will serve as a foundation for the beadboard, so make sure it has clean, even surface.
It’s necessary to also remove any plates or coverings on the wall if you have any.
Step 2: Make Plan
When you’re making your room, think about how everything will be organized. Always make a plan and first lay out your area before beginning your task.
Take measurements of your room to determine how many trim, panels, and paint you’ll need.
- Before installing any panel, be sure that your wall is plumb.
- Draw a line on the wall using a level and pencil to the desired height and width.
- Remember to mark the studs as well using stud finder.
- Measure also any plates or coverings like socket or vent covers.
To prevent material waste, make sure you measure correctly. We have a simple tool named Wainscoting Layout Calculator to help you with that.
Step 3: Gather Materials
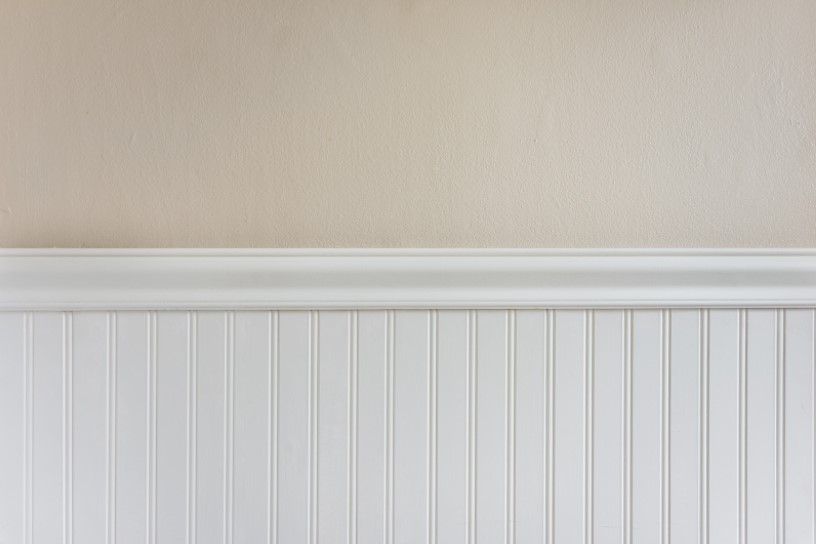
Wainscoting has many distinctive characteristics, but it’s typically made up of three components: paneling, baseboard, and the top trim or chair rail molding. So, we’ll install all of those parts.
There are many different types of baseboard panels available on the market. However, a prefinished panel is the simplest option.
- For the beadboard, I recommend 8×4 MDF beadboard, you can get it on Home Depot or Lowe’s for $22 to $26 each.
- For the baseboard, I recommend 1×6 MDF board, costs around $15-$19 each.
- For the chair rail, I recommend 1×4 MDF board, costs around $2-$3 per linear foot.
Step 4: Install The Baseboard
If you decide to keep your old baseboard, you can skip this step and move to the next step.
Installing a baseboard is easy, and it’s best to install the baseboard first before you install any panel.
- Position the bottom edge of the board on the line drawn on the wall, make sure there’s no gap between the board and the wall.
- If all is ok, you can put construction adhesive along the bottom of the wall to make sure it stays in place
- Where a stud is present, nail the baseboard with a nail gun.
- If you want a more refined look, you may add shoe molding to the bottom of your baseboard.
Step 5: Install The Beadboard
Beadboard is my favorite. It’s the easy to install, and it’s absolutely beautiful on any interior design.
To install it, just follow these simple steps:
- Check that the beadboard you’ve chosen is cut to fit your wall line.
- Make sure the beadboard sits perfectly on the top of the baseboard.
- Then, to ensure that the beadboard is level, use a standard level to make sure it’s exactly horizontal.
- If you have any socket or other coverings, make a square hole in the beadboard using a jigsaw before putting it to the wall.
- Then, as if you were putting a panel on a wall, apply an amount of construction adhesive to the wall, and put the beadboard onto the wall.
- Fasten it to the studs with nails. Repeat this process until all the walls are covered.
Step 6: Install The Chair Rail Molding
It’s important to install the chair rail molding after installing the beadboard because it provides a nice look for the finished beadboard.
Here are the steps to follow in order to install chair molding:
- Prepare the 1×4 boards that have been cut to match the length of the wall.
- Apply construction adhesive to the top of your beadboard panel.
- Install the chair rail and make sure it sits perfectly on both the beadboard and the wall.
- Once you’re satisfied with the placement, nail it to the studs. And you’re done.
Step 7: Finishing
At this point, you’ve completed the installation of a beadboard wainscoting, and you may move on to the next stage: finishing.
Now that we use primed boards for this wainscoting, we only need to caulk and hide the nails.
So, go ahead and hide any visible nails by applying wood filler using putty knife (or just by your hand).
Actually, you can also use caulk to do this job, but using wood filler will give you the best result as caulk can shrink a bit when dry.
But if you manage to use caulk, just be sure to apply it smoothly, and make sure you use caulk that is labelled as paintable.
Then, apply caulk all along the corners, the gaps, or anywhere where water might seep in.
FAQ
Should I install wainscoting?
If you want an easy way to update your home and increase the value of your home without hiring professional help, then yes please!
It will protect your wall and add character. I would recommend installing wainscoting only if the wall underneath isn’t made of brick or concrete as they can sometimes dent or break.
Is wainscoting outdated?
Wainscoting is not outdated and still serves to make an aesthetic appeal to a room. It’s hard to go wrong with adding wainscoting.
Some people can’t stand it, and others like the character and craftsmanship of old-fashioned homes. But there’s also a practical side: Adding wainscoting – whether you paint it or leave it without a covering – helps tame those ugly drywall corners that would otherwise have been left as blank space, always looking messy no matter what you do with them.
What rooms should have wainscoting?
Kitchens, living rooms, corridors, and bedrooms are where people usually install wainscoting.
But the rooms listed above are just some examples – there’s no one, “right” answer. From what I can see so far, I’d recommend looking at your space and figuring out which area is most in need of a textural break to help with visual groundings and spatial orientation. That would determine where you should install wainscoting.
Do you glue or nail wainscoting?
For an extended strength, you glue and nail it. But in general, it’s depending on what materials you use. For example, if you use a delicate beadboard panel, adhesive is enough to make it stay in place. But if you use thicker panels or even wood panels, nails are more appropriate because they have more weigh.
Can I install wainscoting over tile?
Yes, you can install wainscoting over tile. As long as the wall are tiled with resilient flooring adhesive, it should work well. The key is to find an adhesion promoter that has low water sensitivity and paintability, but high shear strength to make sure your wainscot will be permanently attached.
How much does it cost to install a wainscoting?
Cost will vary depending on your location, panel material, size of job. MDF wainscoting costs about $7-$17 per square foot, while solid wood panels can go as high as $15-$40 per square foot.
If you need to find out the cost in your area, call or visit a local supply store for more accurate pricing estimations.
Can I install wainscoting without professional?
Yes, and I have given a step-by-step tutorial on how to do it right above in this post.